
Parameters Comparison
| Cat. No. | BE-SWE-FP |
| Operating mode | The vertical shaking system moves back and forth at high speed. |
| Temperature | -50℃ |
| Temperature control precision | ±1℃ |
| Maximum sample volume | 192 pcs |
| Adapter specification | 24x0.5mL.24x2mL.48x2mL. 32x2mL.60x2mL.96x2mL. 12x5mL.10x10mL.4x30mL(steel can). 6x5mL(steel can).8x15mL(steel can) 2x50mL(steel can).96x2mL(2pcs 96-deep well plate) |
| Freezing chamber | YES |
| Electromagnetic safety lock | Screen click control with automatic power-off unlocking. the cover cannot be opened during operation until the grinding program ends, fully protected. |
| Maximum feeding size | No requirements, adjustable according to the adapter. |
| Weight | 54kg |
| Power parameters | 200-240VAC,50-60 Hz,500 W |
| Cooling method | Compressor cooling |
| Transport screws | Yes (2 at the bottom) |
| Advantages | Lower cooling temperature can reach -50℃. low temperature freezing chamber. Protects samples and meets low-temperature needs for Western Blot experiments, electrophoresis, and transfer membranes. |
Product Information
Unboxing and Installation
1. Carefully remove the High-Speed Low-Temperature Tissue Grinder from its packaging and place it in a suitable location. Verify that all components are included and undamaged.
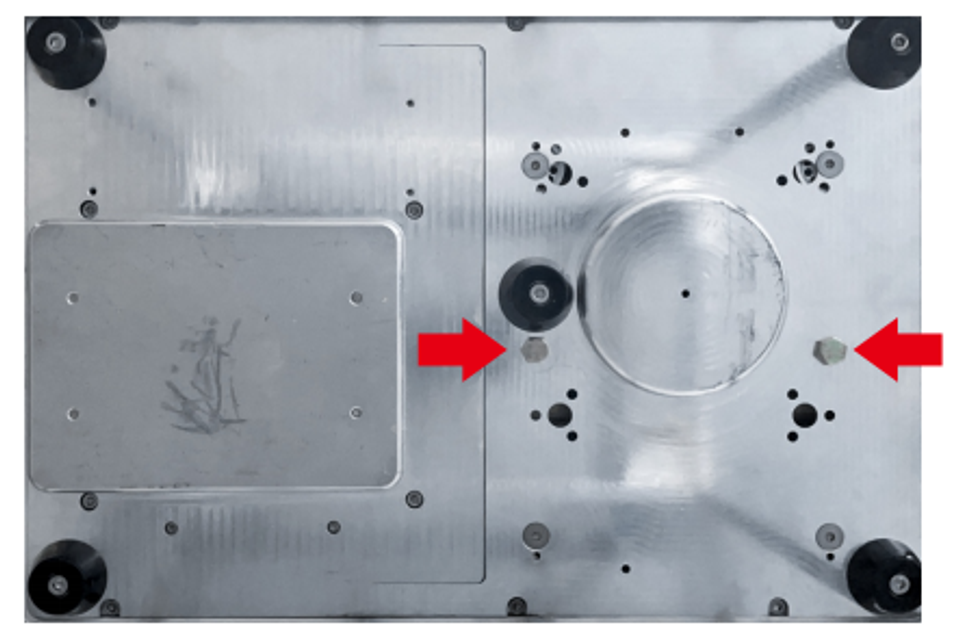
2. Using the wrench provided in the accessory kit, remove the two fastening screws located at the bottom of the instrument. (Note: These screws must be removed before performing the first grinding operation.)
Unboxing and Installation
1. Carefully remove the High-Speed Low-Temperature Tissue Grinder from its packaging and place it in a suitable location. Verify that all components are included and undamaged.
2. Using the wrench provided in the accessory kit, remove the two fastening screws located at the bottom of the instrument. (Note: These screws must be removed before performing the first grinding operation.)
3. Place the grinder on a level and stable laboratory bench to prevent vibration during operation.
4. Allow the unit to stand for at least 10 hours to ensure that the coolant settles properly.
5. Connect the power supply (200–240V) and turn on the main power switch located on the back of the grinder.
6. Switch on the compressor cooling system and wait 10–15 minutes. Observe whether the temperature in the grinding chamber reaches the preset value.
7. Once the chamber reaches the target temperature, install the adapter and locking nut, close the top cover, and the unit is ready for use.
Sample Preparation
1. The grinder can process up to 96 samples simultaneously using the 96-well plate adapter, which includes a base, top cover, and locking nut.
2. Place the samples into individual grinding tubes. It is recommended to use no more than 100 mg of sample per tube.
3. Add the appropriate extraction solution, ensuring the combined volume of the sample and solution does not exceed half the tube’s total capacity.
4. Insert a few grinding beads of suitable size. For larger samples, cut them into smaller pieces with scissors to improve grinding efficiency and consistency.
5. Unscrew the locking nut and remove the top cover. Insert the prepared grinding tubes into the adapter, then reattach the cover and tighten the locking nut clockwise.
6. Ensure that the tubes are placed symmetrically and evenly balanced in the adapter.
Operation Steps
1. Connect the grinder to a grounded 220V power outlet and turn on the main power switch at the back.
2. After the startup interface appears, wait approximately 5 seconds to enter the main operating interface.
3. Once powered on, the cooling system will begin running automatically.
4. Place the grinding tubes containing the samples into the chamber, tighten the adapter, and close the top cover.
5. Set the desired frequency, duration, and number of grinding cycles.
6. Click “Temperature Selection” to choose the desired operating mode and set the temperature for the grinding chamber or cooling platform.
7. Press the Start button to begin grinding. The instrument will automatically stop once the programmed cycle completes.
Equipment Maintenance
Perform routine maintenance after each use to ensure reliable and long-term operation.
1. Always turn off the power and unplug the power cord before cleaning.
2. If solvents, salt water, or acidic/alkaline solutions are spilled on the instrument, immediately wipe them off with a damp cloth to prevent corrosion or damage.
3. Do not use high-pressure sterilization on any part of the grinder or adapter.
4. Clean the adapter components after each use with an appropriate cleaning agent. Rinse with distilled water and dry with a paper towel.
5. Wipe the instrument exterior using a soft cloth dampened with an appropriate cleaning solution.
Recommended Cleaning Agents:
- Standard laboratory cleaning solution
- Neutral detergent
- 70% alcohol solution
Equipment List
| Product Name | Grinding Beads | Frequency | Grinding Time | Pause Time | Cycle times | Recommended Extraction Solution |
|---|---|---|---|---|---|---|
| Plant Stems, Leaves | Stainless Steel Beads 3mm*3, 4mm*1 | 60Hz | 60s | 15s | 3 | Protein Extraction Solution |
| Heart, Liver, Spleen, Lungs, Kidneys, Brain of Mice and Rats | Stainless Steel Beads 3mm*2, 4mm*1 | 60Hz | 30s | 15s | 2 | Protein Extraction Solution |
| Stomach, Intestines, Muscles, Fat, Pancreas of Mice and Rats | Stainless Steel Beads 3mm*2, 4mm*1 | 60Hz | 45s | 15s | 2 | Protein Extraction Solution |
| Skin, Ears, Tail, Blood Vessels of Mice and Rats | Stainless Steel Beads 3mm*3, 4mm*2 | 70Hz | 60s | 20s | 3 | Protein Extraction Solution |
| Cartilage, Hair, Hard Bones of Mice and Rats | Stainless Steel Beads 3mm*4, 4mm*2 | 70Hz | 90s | 20s | 3 | Protein Extraction Solution |
(This condition is for reference only, and can be adjusted at any time during the experiment according to the grinding effect.)
Equipment List
| Product Name | Grinding Beads | Frequency | Grinding Time | Pause Time | Cycle times | Recommended Extraction Solution |
|---|---|---|---|---|---|---|
| Plant Stems, Leaves | Zirconia Beads 3mm*3, 4mm*1 | 60Hz | 60s | 15s | 3 | RNA Extraction Solution |
| Heart, Liver, Spleen, Lungs, Kidneys, Brain of Mice and Rats | Zirconia Beads 3mm*2, 4mm*1 | 60Hz | 30s | 15s | 2 | RNA Extraction Solution |
| Stomach, Intestines, Muscles, Fat, Pancreas of Mice and Rats | Zirconia Beads 3mm*3, 4mm*2 | 60Hz | 45s | 15s | 2 | RNA Extraction Solution |
| Skin, Ears, Tail, Blood Vessels of Mice and Rats | Zirconia Beads 3mm*4, 4mm*2 | 70Hz | 60s | 20s | 3 | RNA Extraction Solution |
| Cartilage, Hair, Hard Bones of Mice and Rats | Zirconia Beads 3mm*3, 4mm*4 | 70Hz | 90s | 20s | 3 | RNA Extraction Solution |
(This conditions are provided for reference only and can be adjusted as needed during the experiment based on the observed grinding results.)
RNA Extraction
When performing RNA extraction, the grinding time is generally longer than that used for protein extraction. Add the appropriate RNA extraction solution to the grinding tube prior to operation.
The exact grinding duration should be adjusted according to the type and amount of tissue being processed. For samples that are difficult to disrupt, repeat the grinding process 2–3 times as needed. The specific parameters can be optimized based on experimental outcomes.
Strong and Tough Tissue Grinding
For hard or fibrous tissues (e.g., cartilage, hair, etc.), follow the steps below:
1. Use a 2 mL grinding tube.
2. Cut the sample into 1–2 mm pieces.
3. Add an appropriate quantity of grinding beads, seal the tube tightly, and freeze in liquid nitrogen for 2–3 minutes. (Do not add extraction solution at this stage.)
4. Perform dry grinding for 60 seconds at 70 Hz.
5. Afterward, add the extraction solution and grind again for one additional cycle.
6. If the grinding result is still unsatisfactory, refreeze the tube in liquid nitrogen and repeat the above steps.
This process ensures effective homogenization of strong, resilient tissue samples.
Bone Tissue Grinding
For bone tissue samples, use the special steel grinding jar and adapter designed for this purpose:
1. Freeze the bone tissue in liquid nitrogen for 5–10 minutes.
2. Place the frozen sample into the steel grinding jar and add steel beads.
3. Grind for 180 seconds at 70 Hz, using the cycle grinding mode.
4. After grinding, transfer the pulverized tissue into a 2 mL grinding tube.
5. Add the extraction solution along with two 3 mm grinding beads, then homogenize for 60 seconds.
This method ensures thorough and consistent grinding of dense bone material, yielding optimal results for downstream extraction and analysis.
Beads Pens
| Catalog # | Product Name | Specifications |
|---|---|---|
| BE-SYM-02B | Beads Pen (Sterile) | Pen with Steel Beads 2 mm |
| BE-SYM-02Z | Beads Pen (RNase & DNase Free, Sterile) | Pen with Pen with Zirconia Beads 2 mm |
| BE-SYM-03B | Beads Pen (Sterile) | Pen with Steel Beads 3 mm |
| BE-SYM-03Z | Beads Pen (RNase & DNase Free, Sterile) | Pen with Zirconia Beads 3 mm |
| BE-SYM-04B | Beads Pen (Sterile) | Pen with Steel Beads 4 mm |
| BE-SYM-04Z | Beads Pen (RNase & DNase Free, Sterile) | Pen with Zirconia Beads 4 mm |
Grinding Tubes
| Catalog # | Product Name | Specifications |
|---|---|---|
| BE-HT-200-M | Grinding Tube, 2.0 mL | 500 pcs/bag |
| BE-HT-200-REM | Grinding Tube, 2.0 mL (Screw cap, self-stand, enzyme-free, dedicated for grinding) | 500 pcs/bag |
| BE-HT-200V-REM | Grinding Tube, 2.0 mL (Screw cap, enzyme-free, dedicated for grinding) | 500 pcs/bag |
Grinding Beads
| Catalog # | Product Name | Specifications |
|---|---|---|
| BE-G0101-200G | Grinding Beads (Steel) | 1mm 200g |
| BE-G0102-200G | Grinding Beads (Steel) | 2mm 200g |
| BE-G0103-200G | Grinding Beads (Steel) | 3mm 200g |
| BE-G0104-200G | Grinding Beads (Steel) | 4mm 200g |
| BE-G0200-130G | Grinding Beads (Zirconia) | 10mm 130g |
| BE-G0201-150G | Grinding Beads (Zirconia) | 1mm 150g |
| BE-G0202-150G | Grinding Beads (Zirconia) | 2mm 150g |
| BE-G0203-150G | Grinding Beads (Zirconia) | 3mm 150g |
| BE-G0204-150G | Grinding Beads (Zirconia) | 4mm 150g |
| BE-G0206-150G | Grinding Beads (Zirconia) | 6mm 150g |
| BE-G0208-130G | Grinding Beads (Zirconia) | 8mm 130g |
| BE-G0210-100G | Grinding Beads (Zirconia) | 0.1mm 100g |
| BE-G0250-100G | Grinding Beads (Zirconia) | 0.5mm 100g |
| BE-G0310-40G | Grinding Beads (Glass) | 0.1mm 40g |
| BE-G0350-40G | Grinding Beads (Glass) | 0.5mm 40g |
Homogenizer Adapters
| Catalog # | Product Name | Specifications |
|---|---|---|
| BE-SWE-3D-0224 | Homogenizer Adapter | 3D 2ML*24 |
| BE-SWE-3D-0224F | Homogenizer Adapter | 3D 2ML*24 |
| BE-SWE-3D-512 | Homogenizer Adapter | 3D 5ML*12 |
| BE-SWE-FP-0224 | Homogenizer Adapter | 2ML*24 |
| BE-SWE-FP-0224F | Homogenizer Adapter | 2ML*24 |
| BE-SWE-FP-0224S | Homogenizer Adapter | 2ML*24 (Solid) |
| BE-SWE-FP-0232 | Homogenizer Adapter | 2ML*32 |
| BE-SWE-FP-0248 | Homogenizer Adapter | 2ML*48 |
| BE-SWE-FP-0248S | Homogenizer Adapter | 2ML*24 (Solid) |
| BE-SWE-FP-0260 | Homogenizer Adapter | 2ML*60 |
| BE-SWE-FP-0296 | Homogenizer Adapter | 2ML*96 |
| BE-SWE-FP-0506B | Homogenizer Adapter | (Steel) 6ML*6 |
| BE-SWE-FP-0512 | Homogenizer Adapter | 5ML*12 |
| BE-SWE-FP-0512F | Homogenizer Adapter | 5ML*12 |
| BE-SWE-FP-1010 | Homogenizer Adapter | 10*10ML |
| BE-SWE-FP-1508B | Homogenizer Adapter | (Steel) 15ML*8 |
| BE-SWE-FP-3004B | Homogenizer Adapter | (Steel) 30ML*4 |
| BE-SWE-FP-3004Z | Homogenizer Adapter | (PTFE) 30ML*4 |
| BE-SWE-FP-5002B | Homogenizer Adapter | (Steel) 50ML*2 |
| BE-SWE-FP-5002Z | Homogenizer Adapter | (PTFE) 50ML*2 |
| BE-SWE-FP-5008 | Homogenizer Adapter | 50ML*8 |
| BE-SWE-FP-9602 | Homogenizer Adapter | 96-well plate *2 |
| BE-SWE-FP-D524 | Homogenizer Adapter | 0.5ML*24 |
| BE-SWE-YWY-3D-35 | Homogenizer Adapter 12-well (for 3D Homogeinzer) | 12 X 5 ML |
| BE-SWR-YMY-WG-18 | Star Knob for Tissue Homogenizer Adapter | Star Knob |
| BE-SWR-YMY-WG-57 | Stainless Steel Nut for Tissue Homogenizer Adapter | Stainless Steel |