
Instrument Structure
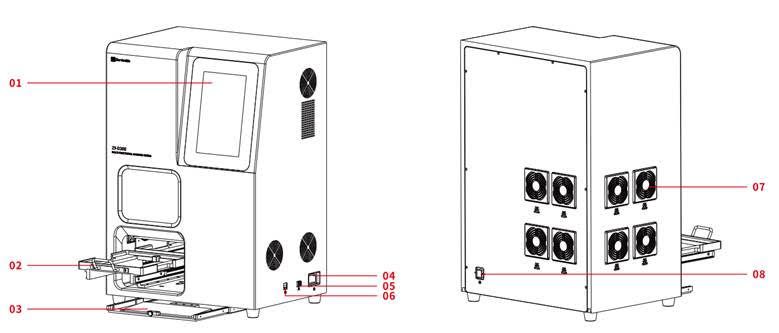
| 1 | Touch Screen Used to select pre-written marking programs. For users who are proficient in using the machine,they can also write their own marking content. |
| 2 | Carrier Adapter and Push-Pull Device Before marking, the carrier and the item to be marked must be placed in the carrier adapter according to the specified orientation.Push the adapter into the machine and let it magnetically attach before operating the system for marking. |
| Note The positioning accuracy of the carrier adapter is high and has undergone precise calibration before delivery.Do not apply any force other than pushing and pulling on the carrier adapter and its push-pull device. | |
| 3 | Keyboard and Mouse Users who are not accustomed to using the touch screen can use a keyboard and mouse as alternatives. |
| 4 | Rocker Switch Controls the power on/off of the entire machine. |
| 5 | USB is Used for connecting external devices such as mouse and keyboard, and supports importing external marking data. |
| 6 | Rj45 Interface Network port supports internet connection. |
| 7 | Fan Cover For continuous use of the machine, the fan cover needs to be cleaned once a week. The specific cleaning method is to remove the cover with hands and shake off the dust from the primary filter cotton. Warning Do not disassemble the fan cover when the machine is powered on. |
| 8 | Power Socket National standard three-core power cord socket. |
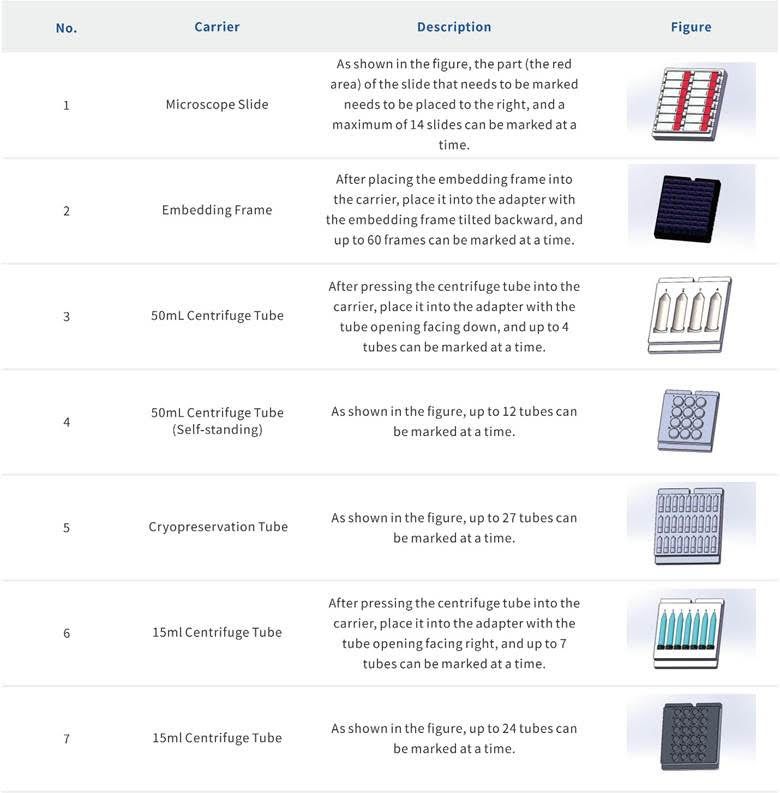
Carrier Introduction
The instrument currently has 7 types of carriers, including 50ml centrifuge tubes (including the cap and the body),15mlcentrifuge tubes (including the cap and the body), embedding frames, slides, cryovials
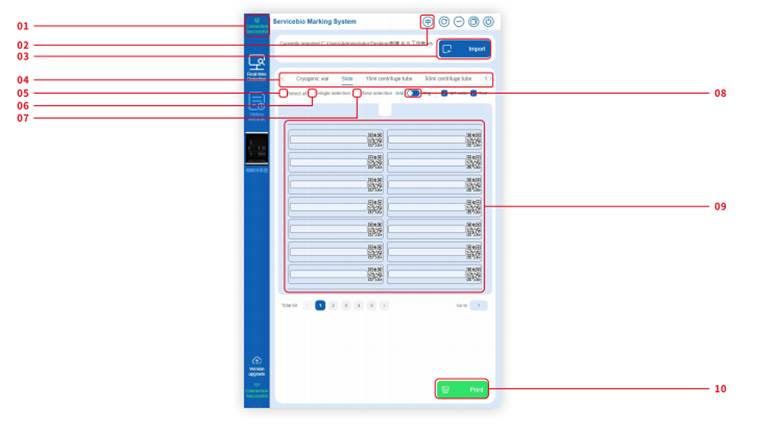
1.1 The red box 1 is a connection status indicator. The printing can only be done when it displays “Connected Successfully”.
1.2 The red box 2 is a button for switching between Chinese and English.
1.3 The red box 3 is an import button. After clicking, you can follow the guidance to select the Excel file that needs to be imported. The import function starts from the second row of the first column, with the first row of the first column defaulting as the header.
1.4 The red box 4 is the product selection area, which can be selected manually or automatically. After the software is properly turned on and displays “Connected Successfully”, pushing the adapter with the products into the marking machine will automatically select the corresponding printing interface based on the recognition results and jump to the corresponding interface.
1.5 The red box 5 is the “Select All” button. When no printing information is selected, selecting this switch will select all the information on the current page.
1.6 The red box 6 allows for single selection, allowing you to choose any one or multiple pieces of information individually.
1.7 The red box 7 is for region selection. After selecting this switch, choose one piece of information, then select another piece of information afterwards, and all the information between them will be selected.
1.8 The red box 8 is the toggle for the illustrated marking function.
1.9 The red box 9 is the printing information area, where you can manually input information or use the import function to input information.
1.10 The red box 10 is the “Print” button. After pushing in the adapter with products and selecting the information that needs to be printed, click this button to start printing.
| Product | BioElite Cat# |
|---|---|
| Multi-Functional Labeling System | BE-ZY-D200 |
Optional Items
| Part Number | Description | Packaging | Technical Characteristics |
|---|---|---|---|
| BE-EP-150X-J | Centrifuge Tube 1.5 mL | 10 pcs/bag, 250 bags/ctn | Sterile, DNase & RNase Free |
| BE-EP-200-J | Centrifuge Tube 2.0 mL | 500 pcs/bag, 10 bags/ctn | Sterile, DNase & RNase Free |
| BE-EP-200X-J | Centrifuge Tube 2.0 mL | 10 pcs/bag, 250 bags/ctn | Sterile, DNase & RNase Free |
| BE-EP-1500-J | Centrifuge Tube 15 mL | 50 pcs/rack, 10 racks/ctn | Sterile, DNase & RNase Free, Foam Rack, Conical Bottom |
| BE-EP-1500-J | Centrifuge Tube 15 mL | 50 pcs/rack, 10 racks/ctn | Sterile, DNase & RNase Free, Foam Rack, Conical Bottom |
| BE-CV-2-KB-ET | Cryogenic Vials 2.0 mL | 50 pcs/rack, 20 racks/ctn | Silicon Ring, External Thread, Leak-Proof, Individually Wrapped |
| BE-CV-2-ET-50 | Cryogenic Vials 2.0 mL | 50 pcs/rack, 40 racks/ctn | Silicon Ring, External Thread, Basic |
| BE-EF-1 | Embedding Cassette | 250 pcs/bag, 2000 pcs/ctn | Single Grid |
| BE-EF-2 | Embedding Cassette | 250 pcs/bag, 2000 pcs/ctn | 2-Grid |
| BE-EF-3 | Embedding Cassette | 250 pcs/bag, 2000 pcs/ctn | 4-Grid |
| BE-G6012-1 | Adhesion Microscope Slides | 50pcs/box | Paraffin, White Painted Edge. Marking area in white color. |